
*** Update November 25, 2019 ***
The DBA method of activating Office 365 ProPlus will be deprecated by Microsoft starting December 1st, 2019.Please see my new blog post for migrating to the new, supported method, DBS: Deploying Office 365 ProPlus Device-based Licensing for EDU
Introduction
Office 365 Pro Plus has been around a few years, and is commonly referred to as the Click-to-Run version. I’m not going to go into too much depth about how Office 365 Pro Plus differs from the standard (old) MSI based install as you can read that on the very detailed Technet document located here: Overview of Office 365 ProPlus. Definitely worth a read to see if this is a good fit for your environment. TL/DR: An Office 365 subscription is required (free for education customers) and the end user experience is the same as MSI based install, but adds the same incredible features as C2R, including update strategy!
Due to Office 365 Pro Plus being a subscription product, it requires an Office 365 account to activate and use the product after install. Most school districts do not have a one-to-one deployment of PC’s, but adopt a shared model, meaning multiple students use the same PC throughout the day. Before device-based activation came along, if the IT dept deployed Office 365 Pro Plus in a shared environment, every time a student logs in to a computer, they would have to activate Office 365 Pro Plus with their Office 365 account, taking away one of the students’ installs on five devices. After the fifth PC they log in to, Office would be unable to activate, and therefore useless for the students.
Thankfully, Microsoft understood this concern and finally brought education customers a specially designed method of activating Office 365 Pro Plus in a shared environment! In fact, they understood signing in to Office at all was disruptive of instructional time, so they designed this method to prevent the students from having to put in any credentials at all! It’s a win-win for education customers, but does take some time to plan and configure. Lets dig in.
Configuration
- Navigate to http://aka.ms/OfficeDBASignup as an Office 365 Global Administrator.
- Click Sign Up

- Sign in with your Global Admin account for the Office 365 tenant you want to enable.
- Click Accept.
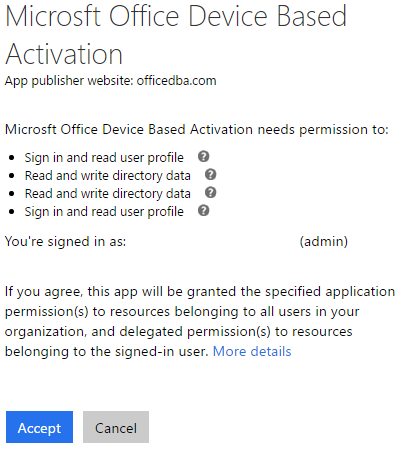
- Office 365 will work it’s magic and provide you with a tenant and a private key. Do not lose these and keep them secure.

- You need the Office 365 Education Plus for Students SKU on your Office 365 Tenant. If you don’t, click the Get Licenses button and then register a single user account as a student. Most EDU customers who are already using O365 have the licenses.
- Select Download Package to download the latest installer of Office 365 C2R.
Packaging
Obtain and extract the necessary files
- You will need to download two main setup files:
- The latest version of the OPPTransition.exe (http://aka.ms/OfficeDBAClient)
- The 2016 version of the Office Deployment Tool (https://www.microsoft.com/en-us/download/confirmation.aspx?id=49117)
- Extract the contents of the oppt_current.zip and officedeploymenttool_7614-3602.exe to C:\temp

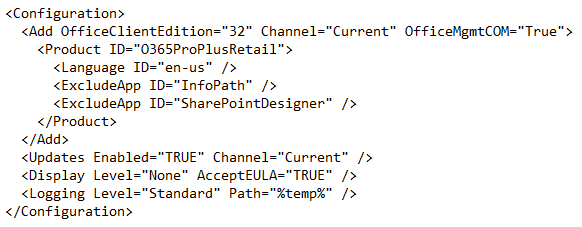
Modify configuration.xml and download Office client bits
The configuration.xml file is the defining document that will instruct the Office 365 DBA installer what to install and how. For example, you can configure what apps are excluded (or included in the case of Project or Visio if you happen to own those), what release channel Office 365 Pro Plus will be installed with, and the behavior of the install (silent, etc). I encourage reading the in depth TechNet article Reference: Configuration options for the Office Deployment Tool on how to correctly modify this XML file to your liking. Be sure to think this step through thoroughly.
ProTip #1: If you want to eventually manage O365 Updates with SCCM, you need the OfficeMgmtCOM="True" property in the configuration.
- Edit the configuration.xml file. An example is provided below:
- Download the O365 source locally to the same folder as the ODT setup executable using the following command:
setup.exe /download configuration.xml
Your new setup folder structure should contain an added Office folder like below:

If you browse into Office you will find various .cab files that have been downloaded. Depending on your configuration.xml, the size of the .cab files and stream*.dat file will vary and will could take some time downloading. In the example below, I downloaded the latest version of Office 365 (as of this writing) which is 16.0.7571.2109.


Note: A warning from Microsoft states “After downloading the source using the command shown above you have the option of setting SourcePath=”INSERT_SOURCE” to populate the install path dynamically at runtime to the OPPTransition.exe working directory. This dynamic variable also works for the UpdatePath property. Ensure that the Office source folder is named “Office” and that the configuration file is name “configuration.xml” and that both are located in the same directory as OPPTransition.exe. If your environment requires different configurations utilize different source folders to maintain the established file naming conventions.”
- Configure your command line to install Office 365 Pro Plus with your tenant and desired outcome. (Taken directly from DBA Guide published by MSFT)
- You will begin with OPPTransition.exe. Optional parameters are shown in [brackets] –Version 15 is Office 2013 and 16 is 2016, -Verbose enables additional office logs, and the “–No” parameters bypass install or uninstall.
OPPTransition.exe -Tenant eb964cd9-bb80-4b88-b253-878ab5f2d28f -Key ba36435a-990f-486b-9494-c4df8e3457ef -Domain contoso.onmicrosoft.com [-Version 16] [-NoInstall] [-NoUninstall] [-Verbose] [-UninstallVersion msi|c2r|msi10|msi15|msi16]
Important: The –Domain parameter used must reference a managed domain (such as *.onmicrosoft.com) and not a federated domain.
Sample Scenarios
1) Swap an existing 2013 MSI for Office 365 ProPlus 2016 C2R
OPPTransition.exe -Tenant eb964cd9-bb80-4b88-b253-878ab5f2d28f -Key ba36435a-990f-486b-9494-c4df8e3457ef -Domain contoso.onmicrosoft.com -UninstallVersion msi15
2) Swap any existing version of Office for Office 365 ProPlus 2016 C2R
OPPTransition.exe -Tenant eb964cd9-bb80-4b88-b253-878ab5f2d28f -Key ba36435a-990f-486b-9494-c4df8e3457ef -Domain contoso.onmicrosoft.com
3) Install and activate Office 365 ProPlus 2013 C2R on a device that does not yet have Office installed
OPPTransition.exe -Tenant eb964cd9-bb80-4b88-b253-878ab5f2d28f -Key ba36435a-990f-486b-9494-c4df8e3457ef -Domain contoso.onmicrosoft.com -NoUninstall –Version 15
4) Activate an already installed Office 365 ProPlus 2016 C2R (for example in a task sequence during PC imaging)
OPPTransition.exe -Tenant eb964cd9-bb80-4b88-b253-878ab5f2d28f -Key ba36435a-990f-486b-9494-c4df8e3457ef -Domain contoso.onmicrosoft.com -Version 16 -NoInstall -NoUninstall
Save these commands as you need in separate bat files for easy modification and retention. Don’t forget to replace tenant and key with your own! 🙂
- You will begin with OPPTransition.exe. Optional parameters are shown in [brackets] –Version 15 is Office 2013 and 16 is 2016, -Verbose enables additional office logs, and the “–No” parameters bypass install or uninstall.
Test the Install
Finally, on a test machine, open CMD prompt as admin and run the command you created based on the samples above. The scenario initiated will determine how long the install process takes along with client resources. An internet connection is required during install to ensure the device is activated in Office 365. My test installs took anywhere between 30-60 minutes.

Note: Some information above like the tenant, key and file path have been redacted for publication
Once installed, you can verify the installation was successful by the following ways:
- The product is installed, you can open it, and it is activated.

- You can see the device account in the Users section in your Office 365 Admin Center and licensed.
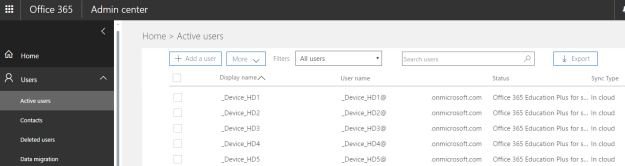
Example of devices activated in Office 365 Admin Center
Deployment
Once you have successfully installed Office 365 Pro Plus and are happy with the results, you can prepare for deployment. My deployment tool of choice is SCCM, so those steps will be shown below. However, the basic packaging is done, so you should be able to push out via Group Policy, KACE, LanDesk (now HEAT) or other deployment solution very similarly.
- Open SCCM console, and go to the Software Library workspace.
- In the Applications node, select Create Application.
- Select the second option, Manually specify the application information. Click Next.
- On the General Information screen, give the application a name such as Microsoft O365 Pro Plus – DBA. Click Next.
- Provide extra details in the Application Catalog as you deem necessary. Click Next.
- On the Deployment Types screen, click Add.
- Select Script Installer as your type and select Manually specify the deployment type information.
- Under General Information give the deployment type a name. Click Next.
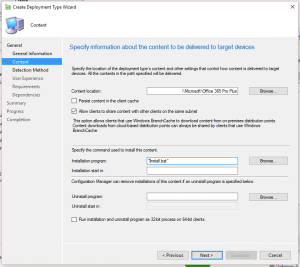
- On the Content screen, select the content location.
- For Installation program you have couple of options:
- Put the OPPTransition.exe command line you created earlier directly in this field
- Put the command in a wrapper (bat file) and select the wrapper as the install program (this is my preferred method)
- Click Next.
- Under Detection Method, click Add.
- Use the following settings for accurate detection method:
- Setting Type: Registry
- Hive: HKEY_LOCAL_MACHINE
- Key: SOFTWARE\Microsoft\Windows\CurrentVersion\Uninstall\O365ProPlusRetail – en-us
- Value: DisplayVersion
- Data Type: Version
- This registry setting must satisfy the following rule to i indicate the presence of this application
- Operator: Greater than or equal to
- Value: 16.0.7571.2109 (or the latest version that you are deploying)
- Click OK. Click Next.
- On User Experience, set the Installation behavior to Install for system and the Logon requirement to Whether or not a user is logged on.
- Click Summary as you do not need to add any requirements or dependencies unless your specific environment calls for it.
- Click Finish.
- Distribute the content.
- Deploy to desired collection!


ProTip #2: If you use ADFS in your environment, make sure your ADFS proxy servers are not rebooted during deployment to clients. :)
Bonus: Deploying Office 365 Pro Plus during OSD
The best method that I have found is to bake the Office 365 Client right into your reference image. You can use the same install bits for installing the client during your reference image build, but you don’t want to run it using the OPPTransition.exe installer.
I build my reference images in MDT. Mikael Nystrom, aka the Deployment Bunny, has a super useful script to put Office 365 client in your reference image the correct way. This is nice because you still leverage the bits the ODT downloaded earlier, but you don’t have to run the install command you created. For my purposes this script works like a charm. Thanks Mikael!
If you use SCCM to deploy your images, you will need to modify the deployment task sequence to convert the standard Office 365 Client install you put in your reference image to the device based activated installer. This can be achieved by creating a package (without a program) containing the OPPTransition.exe and source bits.
Simply add a Run Command Line step to your TS, with the command to convert the install from regular C2R to DBA (see sample 4 above) referencing the newly created package. An example is below:

Updates
Now that you have deployed Office 365 Pro Plus, you will have to manage it. There are a couple of tools to help you do so.
Group Policy – Will help you define the channel the client is on, notifications, and how the client is managed. This is great to have configured as a backup too.
Download the Office 2016 ADMX/ADML templates here: https://www.microsoft.com/en-us/download/details.aspx?id=49030
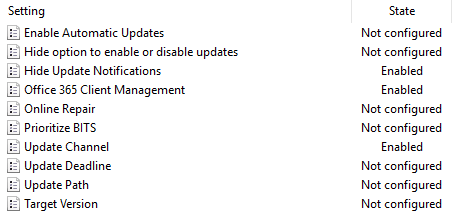
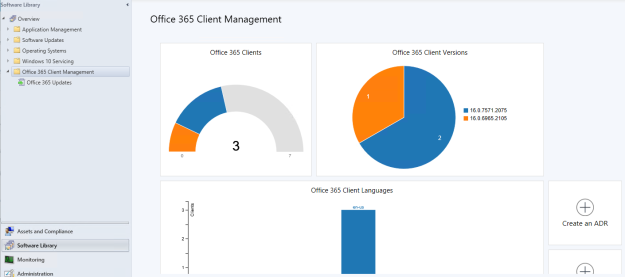
ConfigMgr CB – In version 1602, the ConfigMgr team introduced a new way to help manage Office 365 Client updates.
- The Office 365 Client Management node now provides an in-console view to your Office 365 clients. Complete with charts and graphs to make any manager happy, you can quickly visualize the state of your Office 365 clients in your domain. Learn more here: https://docs.microsoft.com/en-us/sccm/sum/deploy-use/manage-office-365-proplus-updates
- New Automatic Deployment Rule Template for managing Office 365 Clients effortlessly and consistently.

One final tweak I made to my deployment was to convert the release channel immediately after install for new updates to automatically be applied. By default, despite the what the configuration.xml states, the new install will always default to the “Deferred Channel”. We evaluated the “Current Channel” in our environment and deemed it was stable enough to adopt across the board. After all, we have to keep Office updated to compete with Google Apps (G Suite) now, right?
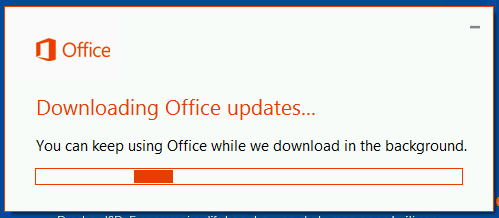
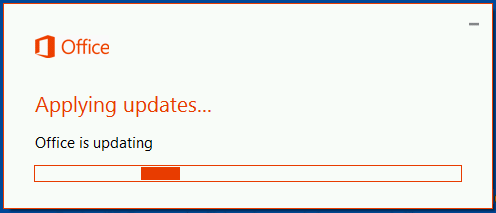
Add this small script to your wrapper after the OPPTransition.exe install to convert from Deferred to Current Channel.
setlocal
reg query HKEY_LOCAL_MACHINE\SOFTWARE\Microsoft\Office\ClickToRun\Configuration\ /v CDNBaseUrl
if %errorlevel%==0 (goto SwitchChannel) else (goto End)
:SwitchChannel
reg add HKEY_LOCAL_MACHINE\SOFTWARE\Microsoft\Office\ClickToRun\Configuration /v CDNBaseUrl /t REG_SZ /d "http://officecdn.microsoft.com/pr/492350f6-3a01-4f97-b9c0-c7c6ddf67d60" /f
reg delete HKEY_LOCAL_MACHINE\SOFTWARE\Microsoft\Office\ClickToRun\Configuration /v UpdateUrl /f
reg delete HKEY_LOCAL_MACHINE\SOFTWARE\Microsoft\Office\ClickToRun\Configuration /v UpdateToVersion /f
reg delete HKEY_LOCAL_MACHINE\SOFTWARE\Microsoft\Office\ClickToRun\Updates /v UpdateToVersion /f
reg delete HKEY_LOCAL_MACHINE\SOFTWARE\Policies\Microsoft\Office\16.0\Common\OfficeUpdate\ /f
"%CommonProgramFiles%\microsoft shared\ClickToRun\OfficeC2RClient.exe" /update user
:End
Endlocal
After this runs, you will see a small pop up that states Office is downloading the updates and then applying them. It takes a bit to run, but works great.
That’s it! You should be able to fully set up, configure, deploy and manage Office 365 Device Based Activation installs in your district or campus now. Feedback is much appreciated, so feel free to drop a comment and let me know if I have something wrong or a better way to do something.
Resources
Curated Office 365 DBA resources: https://aka.ms/OfficeDBA
Office 365 Pro Plus DBA FAQ: https://docs.com/steve-faehl-1/09628b7f-3cee-418d-a136-23c8ffe856ea/device-based-activation-faq

Great blog
LikeLike
Thank you!
LikeLiked by 1 person
Wow. Thank you very much for this post! Cheers!
LikeLike
Thanks mate! Glad you found it of some use!
LikeLike
Could you give an example of how I would deploy device based Office 365 Pro Plus C2R and then add individually licensed apps like Visio to that installation for a portion of those computers? if I buy 30 copies of Visio using our campus agreement, how are those installed. Do I need to maintain two “Office” folders with separate config.xml files — one with Visio and one without and remove/reinstall it to get Office 365 with Viso? Or do I just go into the tenant and add Visio the computer’s object that was created by OPPTransition and it comes down to the machine through magic?
LikeLike
Todd –
Good question…I haven’t done this yet, but based off of the TechNet article (https://technet.microsoft.com/en-us/library/mt703272.aspx?f=255&MSPPError=-2147217396) it looks like you would have to maintain two separate instances and do an install/reinstall. I will explore the scenario too and let you know my experiences. If I come up with a better solution, I’ll be sure to update the post.
LikeLiked by 1 person
Pingback: Device Based Activation for Office365 ProPlus – Great For Education | SamuelMcNeill.com
Pingback: MMS 2017 Review | SysAdminEDU
The steps work almost perfectly. Although when I deploy this with SCCM, it will successfully install office but the deployment will state that it failed – and if it’s a required deployment then it will state that it is Past Due.. The error seems to have something to do with the detection method.. The Version after the install matches what I have in the detection method but that doesn’t seem to matter.. Have you had any issue with this?
LikeLike
You’re right it definitely sounds like the detection method. Mine is still working as documented above and I have not seen that behavior. Could there be a typo somewhere? Make sure the key is “HKLM\SOFTWARE\Microsoft\Windows\CurrentVersion\Uninstall\O365ProPlusRetail – en-us” (language and spaces included) and that DisplayVersion (without spaces) is the correct Value, while “Version” is the selected data type. If so, I’m interested to see if there might be an update with the latest install bits in the registry and that the documented value above no longer works? You might dig around in the registry and ensure those reg keys are there. I will too and update if necessary. Let me know your findings.
LikeLike
I have this mostly working. i was afraid I would need to have multiple sources for different combinations of applications. The key is to get all the C2R software you want on the machine first and then run OPPTransition in activation only mode (with the -NoInstall NoUninstall switches) This will just activate whichever applications you have on the computer. So I bake in the full office 2016 c2r into my base image and then use a “package” that calls setup with a special XML to remove Outlook, Groove, and other pieces on particular computers and then at the end I do an activate only. That way you dont have to worry about the inability to specify multiple custom XMLs in OPPTransition — just do the install and remove using Setup.exe where you CAN specify one of multiple XMLs and OPPTransition to activate only, where you CANNOT specify multiple different XMLs.. The one trouble I have left – how to block OPPTransition from popping up a notification at the end. I call OPPTransition from a script and it hangs the install waiting for a user to click “OK” I see that I am now activated. Any idea on how to suppress the notification of OPPTransition?
LikeLiked by 1 person
Quick question regarding your additions for adding 0365 to base image. I have added the bits and installer for the base image, but the way you worded the package to do the device based activation makes it seems during the TS I will also need to copy ALL of the source bits to activate. So am I reading this right that the only shortcut with this is in the install time?
Since the bits are around 1.4GB this adds alot of data and time to push this package just for activation purposes.
LikeLike
My apologies. I’ll try to correct the wording. No, you don’t need the entire package! I made an SCCM package pointing to just the OPPT folder in my installation. Like you, I did not want the “Office” folder which contains “Data” which contains the large binaries to download during OSD. So I just have my configuration.xml, opptransition.exe, the scrub.vbs scripts and the setup.exe files in the package. So it’s downloading only about 5MB. Does that makes sense?
LikeLike
Perfect sense. Thanks for clarifying.
LikeLike